FreeCAD-manual
An experiment at reorganizing the contents of the FreeCAD wiki in an easier, friendlier book-like manner. The manual is now hosted on the FreeCAD wiki
Preparing models for 3D printing
One of the main uses of FreeCAD is to produce real-world objects. These can be designed in FreeCAD, and then made real by different ways, such as communicated to other people who will then build them, or, more and more frequently, sent directly to a 3D printer or a CNC mill. This chapter will show you how to get your models ready to send to these machines.
If you have been cautious while modeling, most of the difficulty you might encounter when printing your model in 3D has already been avoided. This involves basically:
- Making sure that your 3D objects are solid. Real-world objects are solid, the 3D model must be solid too. We saw in earlier chapters that FreeCAD helps you a lot in that regard, and that the Part Design Workbench will notify you if an operation will prevent your model from remaining solid. The Part Workbench also contains a
 Check Geometry tool that is handy to check further for possible defects.
 - Making sure of the dimensions of your objects. One millimeter will be one millimeter in real-life. Every dimension matters.
- Controlling the degradation or loss of accuracy. No 3D printing or CNC milling system can take FreeCAD files directly. Most of them will only understand a machine language called G-Code. G-code has dozens of different dialects, each machine or vendor usually using its own. The conversion of your models into G-Code can be easy and automatic, or you can also do it manually, with total control over the output. In any case, some loss of quality of your model will unavoidably occur during the process. When printing in 3D, you must always make sure this loss of quality stays below your minimal requirements.
Below, we will assume that the first two criteria are met, and that by now you are able to produce solid objects with correct dimensions. We will now see how to address the third point.
Exporting to slicers
This is the technique most commonly used for 3D printing. The 3D object is exported to another program (the slicer) which will generate the G-code from the object, by slicing it into thin layers (hence the name.) The G-code is generated for each 2D slice and when all the 2D slices are added together totals the desired 3D object. Since many of those printers are home-built, there are often small differences from one to the other. The slicer programs usually offer advanced configuration possibilities that allow tweaking the output exactly for the particularities of your 3D printer.
Actual 3D printing, however, is a too vast subject for this manual. But we will see how to export and use these slicers to check that the output is correct.
Converting objects to meshes
None of the slicers will, at this date, take solid geometry as we produce in FreeCAD as input. So we will need to convert any object we want to 3D print into a mesh first, which the slicer can open. Fortunately, converting a solid to a mesh, is very straightforward. However the additional step will introduce some inaccuracies with the original model. We need to check that the accuracy degradation stays within acceptable limits.
All the mesh handling, in FreeCAD, is done by another specific workbench, the Mesh Workbench. This workbench contains, the tools that convert between Part and Mesh objects, several utilities meant to analyze and repair meshes. Although working with meshes is not the focus of FreeCAD, when working with 3D modeling, you often need to deal with mesh objects, since their use is very widespread among other applications. This workbench allows you to handle them fully in FreeCAD.
- Let’s convert one of the objects we modeled in the previous chapters, such as the Lego piece (which can be downloaded from the end of the previous chapter).
- Open the FreeCAD file containing the Lego piece.
- Switch to the Mesh Design Workbench
- Select the Lego brick
- Select from the top menu Meshes → Create Mesh from Shape
- A task panel will open with several options. Some additional meshing algorithms (Mefisto or Netgen) might not be available, depending on how your version of FreeCAD was compiled. The Standard meshing algorithm will always be present. It offers less possibilities than the two others, but is totally sufficient for small objects that fit into the maximum print size of a 3D printer.
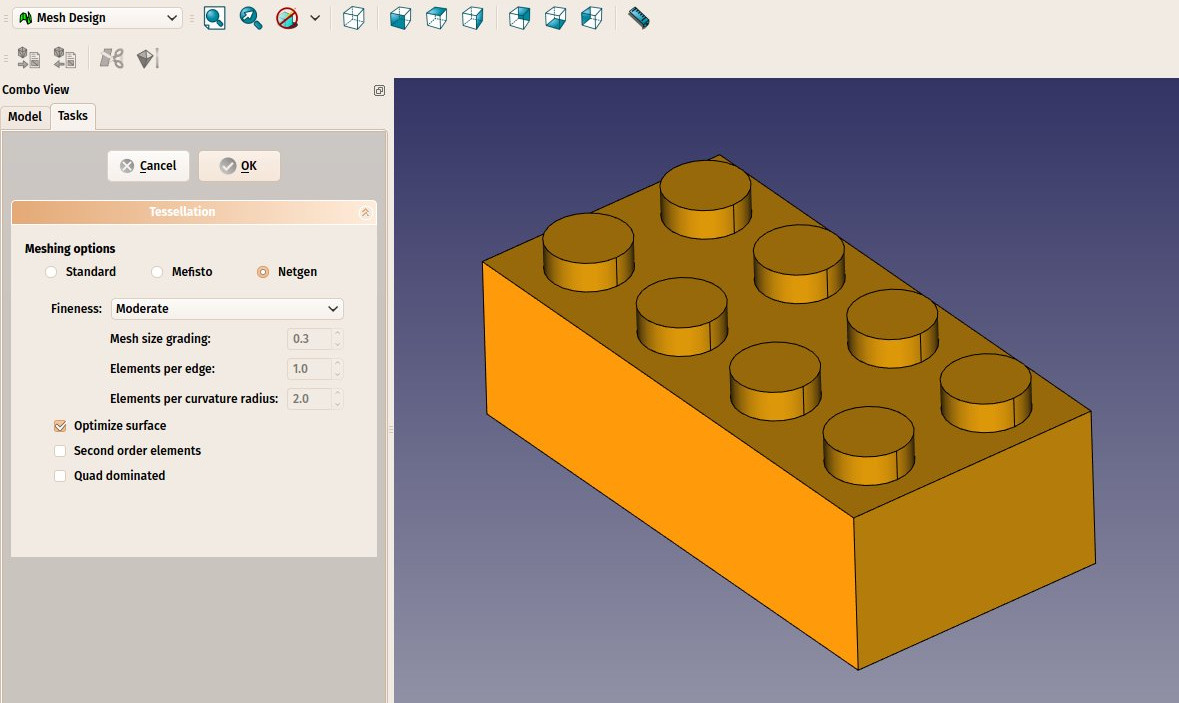
- Select the Standard mesher, and leave the deviation value to the default value of 0.10. Press Ok.
- A mesh object will be created, exactly on top of our solid object. Either hide the solid, or move one of the objects apart, so you can compare both.
- Change the View → Display Mode property of the new mesh object to Flat Lines, in order to see how the triangulation occurred.
- If you are not happy, and think that the result is too coarse, you can repeat the operation, lowering the deviation value. In the example below, the left mesh used the default value of 0.10, while the right one uses 0.01. If we would look at the Task tab for the two meshes, (highlight the (Meshed) line in the Model tree, and click on Task tab) we might see 716 points and 1428 facets in the coarser deviation with 3440 points and 6876 facets with the smaller deviation. The higher the number of points and facets, the more accurately the mesh follows the model curves, with an increasing complexity/file size:
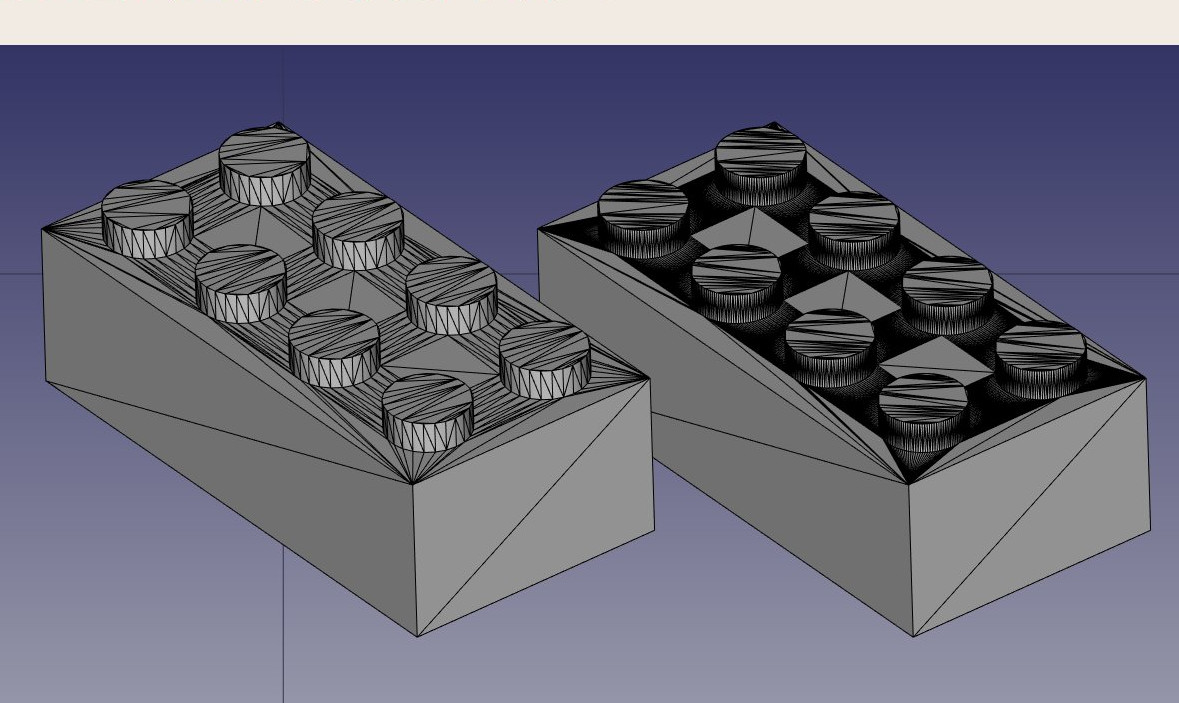
In most cases, though, the default values will give a satisfying result.
- We can now export our mesh to a mesh format, such as STL, which is currently the most widely used format in 3D printing, by using menu File → Export and choosing the STL file format.
If you don’t own a 3D printer, it is usually very easy to find commercial services that will print and send you the printed objects by mail. Among the famous ones are Shapeways and Sculpteo, but you will also usually find many others in your own city. In all major cities, you will also nowadays find Fab labs, which are workshops equipped with a range of 3D manufacturing machines, almost always including at least one 3D printer. Fab labs are usually community spaces, that will let you use their machines, for a fee or for free depending on the Fab lab, but also teach you how to use them, and promote other activities around 3D manufacturing.
Using Slic3r
Slic3r is an application that converts STL objects into G-code that can be sent directly to 3D printers. Like FreeCAD, it is free, open-source and runs on Windows, Mac OS and Linux. Correctly configuring things for 3D printing is a complicated process, where you must have a good knowledge of your 3D printer, so it is not very useful to generate G-code before actually going to print (your G-code file might not work well on another printer), but it is useful for us, to check that our STL file will be printable without problems.
This is our exported STL file opened in Slic3r. By using the preview tab, and moving the right slider, we can visualize the path that the 3D printer head will follow to construct our object.

Using the Cura addon
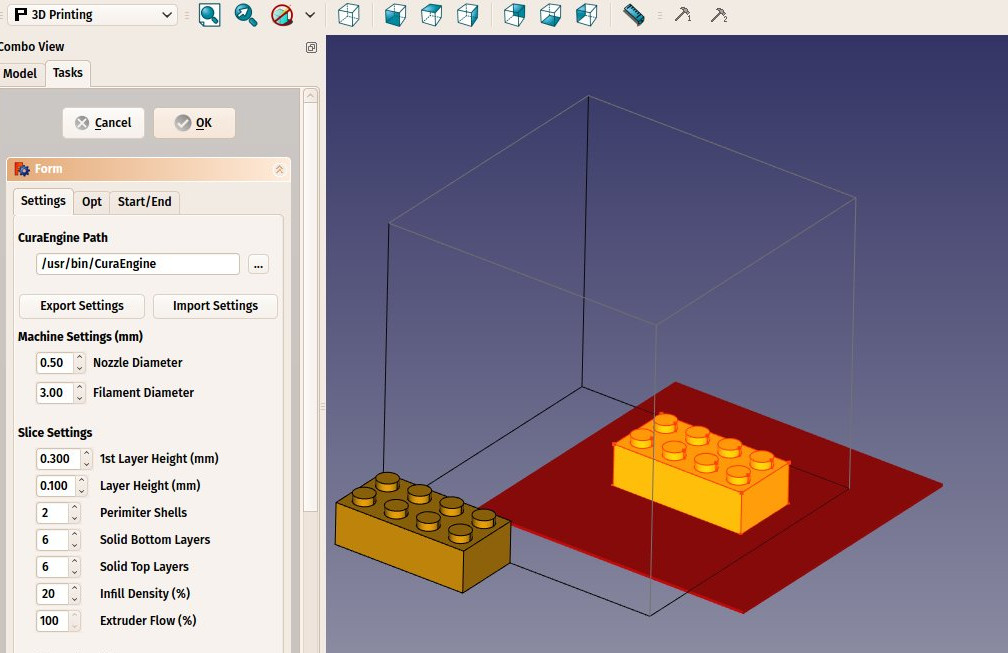
Cura is another free and open-source slicer application for Windows, Mac and Linux, maintained by the 3D printer maker Ultimaker. Some FreeCAD users have created a Cura Workbench that uses Cura internally. The Cura Workbench is available from the FreeCAD addons repository. To use the Cura Workbench, you also need to install Cura itself, which is not included in the workbench.
Once you have installed both Cura and the Cura Workbench, you will be able to use it to produce the G-code file directly from Part objects, without the need to convert them to meshes, and without the need to open an external application. Producing another G-code file from our Lego brick, using the Cura Workbench this time, is done as follows:
- Load the file containing our Lego brick (it can be downloaded at the end of the previous chapter)
- Switch to the Cura Workbench
- Setup the printer space by choosing menu 3D printing → Create a 3D printer definition. Since we aren’t going to print for real, we can leave the settings as they are. The geometry of the printing bed and available space will be shown in the 3D view.
- Move the Lego brick to a suitable location, such as the center of the printing bed. Remember that PartDesign objects cannot be moved directly, so you need either to move its very first sketch (the first rectangle), or to move (and print) a copy, which can be made with the Part → Create Simple Copy tool. The copy can be moved, for example with
 Draft → Move.
 - Select the object to be printed, and select menu 3D printing → Slice with Cura Engine.
- In the task panel that will open, make sure the path to the Cura executable is correctly set. Since we are not going to really print, we can leave all other options as they are. Press Ok. Two files will be generated in the same directory as your FreeCAD file, an STL file and a G-code file.
- The generated G-code can also be re-imported into FreeCAD (using the slic3r pre-processor) for checking.
Generating G-code
FreeCAD also offers more advanced ways to generate G-code directly. This is often much more complicated than using automatic tools as we saw above, but has the advantage to let you fully control the output. This is usually not needed when using 3D printers, but becomes very important when dealing with CNC milling, as the machines are much more complex.
G-code path generation in FreeCAD is done with the Path Workbench. It features tools that generate full machine paths and others that generate only parts of a G-code project, that can be assembled to form a whole milling operation.
Generating CNC milling paths is another subject that is much too vast to fit in this manual, so we are going to show how to build a simple Path project, without caring much about most of the details of real CNC machining.
- Load the file containing our Lego piece, and switch to the Path Workbench.
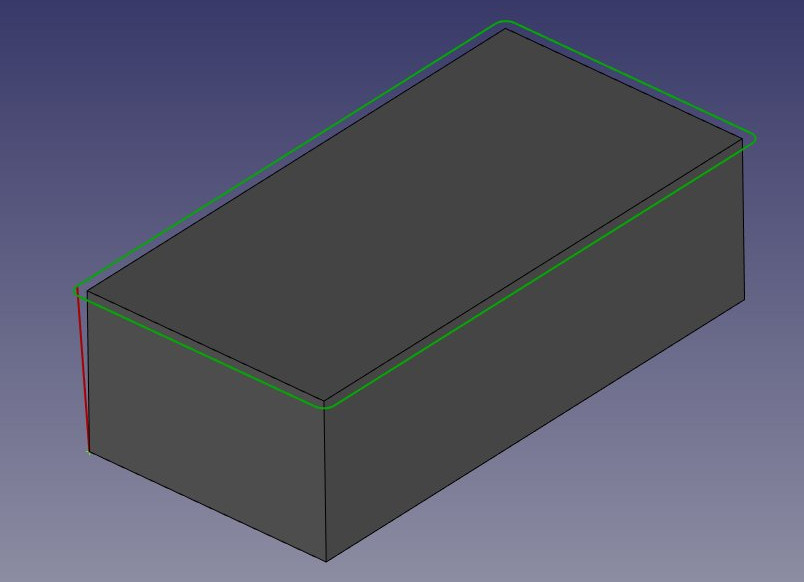
- Since the final piece doesn’t contain a rectangular top face, hide the final Lego piece, and show the first cubic pad that we did, which has a rectangular top face.
- Select the top face and press the
 Face Profile button.
 - Set its Offset property to 1mm.
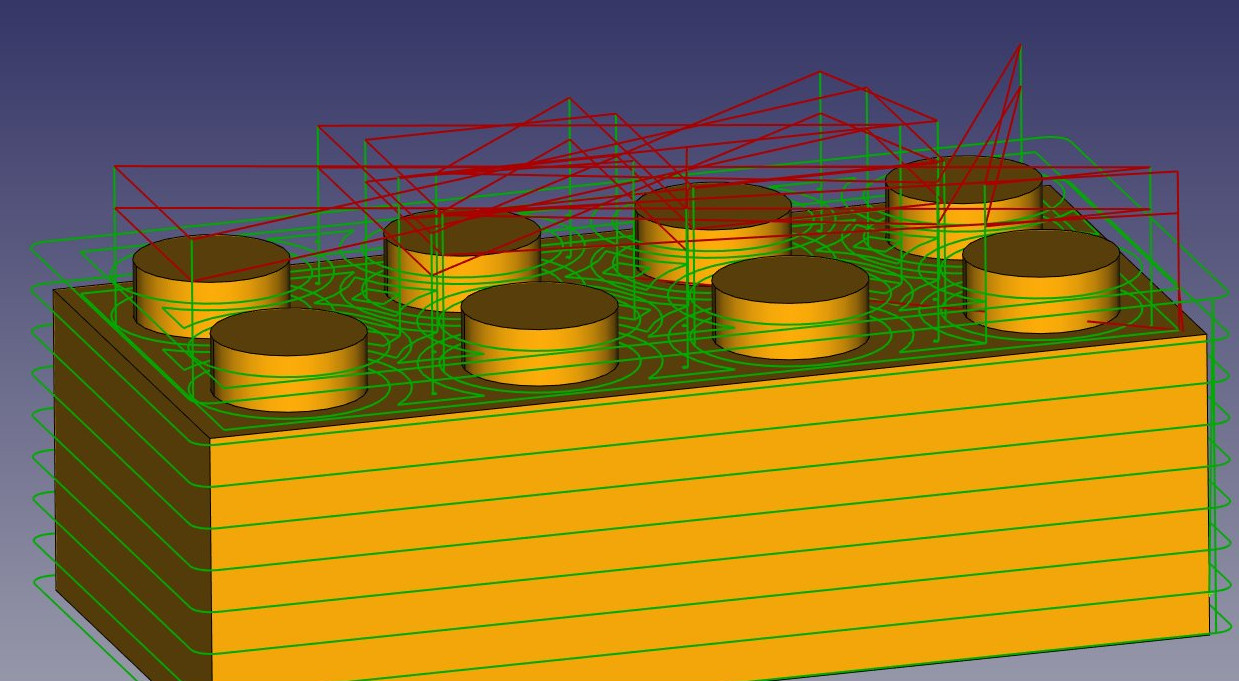
- Then, let’s duplicate this first loop a couple of times, so the tool will carve out the whole block. Select the FaceProfile path, and press the
 Array button.
 - Set the Copies property of the array to 8, and its Offset to -2mm in the Z direction, and move the placement of the array by 2mm in the Z direction, so the cutting will start a bit above the pad, and include the height of the dots too.

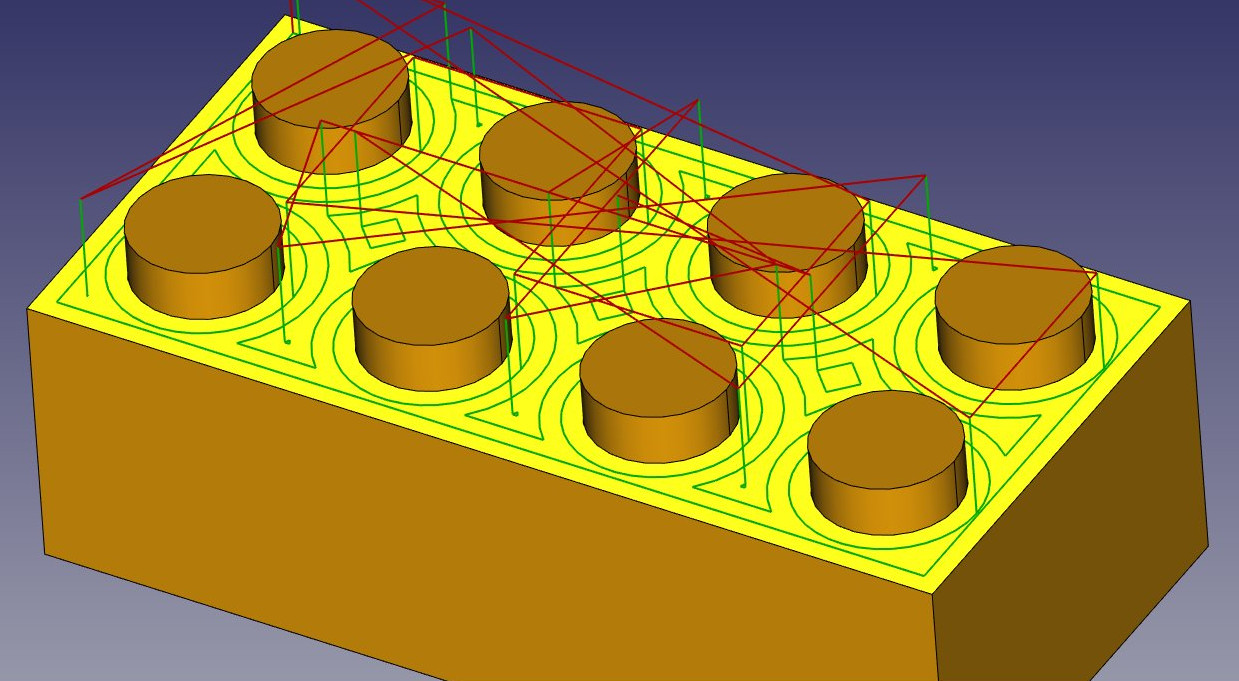
- Now we have defined a path that, when followed by the milling machine, will carve a rectangular volume out of a block of material. We now need to carve out the space between the dots, in order to reveal them. Hide the Pad, and show the final piece again, so we can select the face that lies between the dots.
- Select the top face, and press the
 Face Pocket button. Set the Offset property to 1mm, and the retraction height to 20mm. That is the height to where the cutter will travel when switching from one loop to another. Otherwise, the cutter might cut right through one of our dots:
- Once again, make an array. Select the FacePocket object, and press the Array button. Set the Copies number to 1 and the offset to -2mm in the Z direction. Move the placement of the array by 2mm in the Z direction. Our two operations are now done:
- Now all that is left to do is to join these two operations into one. This can be done with a Path Compound or a Path Project. Since we will need nothing more and will be ready to export already, we will use the project. Press the
 Project button.
 - Set the Use Placements property of the project is to True, because we changed the placement of the arrays, and we want that to be taken into account in the project.
- In the tree view, drag and drop the two arrays into the project. You can reorder the arrays inside the project if needed, by double-clicking it.
- The project can now be exported to G-code, by selecting it, choosing menu File → Export, selecting the G-code format, and in the pop-up dialog that will open, selecting a post-processing script according to your machine.
There are many applications available to simulate the real cutting, one of them that is also multi-platform and open-source, like FreeCAD, is Camotics.
Downloads
- The STL file generated in this exercise: https://github.com/yorikvanhavre/FreeCAD-manual/blob/master/files/lego.stl
- The file generated during this exercise: https://github.com/yorikvanhavre/FreeCAD-manual/blob/master/files/path.FCStd
- The G-code file generated in this exercise: https://github.com/yorikvanhavre/FreeCAD-manual/blob/master/files/lego.gcode
Read more
- The Mesh Workbench: https://wiki.freecad.org/index.php?title=Mesh_Module
- The STL file format: https://en.wikipedia.org/wiki/STL_%28file_format%29
- Slic3r: http://slic3r.org/
- Cura: https://ultimaker.com/en/products/cura-software
- The Cura Workbench: https://github.com/cblt2l/FreeCAD-CuraEngine-Plugin
- The Path Workbench: https://wiki.freecad.org/index.php?title=Path_Workbench
- Camotics: http://camotics.org/